Table of Contents
Want to give feedback? Please send an email to www-tuki@uwasa.fi
Administration
General settings
Modifying the appearance
Adding content – General instructions
Signing in and out
- Sign in to the platform at uwasa.fi/register/create-new-site-en
- When you are ready to sign out, hover over your own name in the upper-right corner and select Log Out.
- Close your web browser!
Issuing rights to update
If you want to issue rights to update your blog or website to another user, please send an email to www-tuki@uwasa.fi
Changing the address
If you want to change the address of your blog or website, please send an email to www-tuki@uwasa.fi
Backup-copying
If you want a backup copy of your blog or website, for example, to your personal computer, please send an email to www-tuki@uwasa.fi
Analytics
If you would like to view analytics for your blog/website (for example, the number of visitors), please send an email to www-tuki@uwasa.fi
Setting the language and date format
In General settings, you can choose, for example, the language and the default time and date formats for your blog or website.
- In the main navigation menu on the left, select Settings > General.
- Choose the settings for Site Language, Timezone, Date Format and Time Format.
- Select Save Changes.
Creating language versions
If you need different language versions of your website, please send an email to www-tuki@uwasa.fi
Setting the front page
On the front page, you can show your latest posts or a static page that you have created. By default, the front page of a blog lists your latest posts from the newest to the oldest. The default front page of a website is a sample page.
- In the main navigation menu on the left, select Settings > Reading.
- In Your homepage displays, select the front page of your choice.
- If you want to list your posts from the newest to the oldest, select Your latest posts.
- If you want to show a page, select A static page and choose the front page (Homepage).
- If you want to list your latest posts on another page instead, select that page in Posts page.
- NOTE: If the settings seem to lack some choices, please make sure that your site has pages that have been published.
- Select Save Changes.
Settings for permalinks
If you change the settings for the structure of permalinks, all links directing to your blog/website need to be updated for them to work. Therefore, select the address structure as you start the blog/website. By default, it is set to Day and name, which gives posts addresses that contain the day and name and pages addresses that contain the name only.
- In the main navigation menu on the left, select Settings > Permalinks.
- In Common Settings, select the structure, for example, Day and name.
- Select Save Changes.
Setting an image for your blog or website
You can choose the image that is shown, for example, in links directing to your blog/website.
- In the main navigation menu on the left, select Blog Settings (for a blog) or Site Settings (for a website).
- In Blog Image / Site Image, select Add Image.
- Choose an image from the media library or upload a new image by dragging the file to the Upload Files window.
- Enter an alternative text (Alt Text) to describe the purpose of the image.
- Click the Select button.
- Select Update.
Setting the tagline and search engine visibility
In general settings, you can enter a tagline to describe your blog/website. In the reading settings, you can affect the visibility in search engines. This setting also controls whether your blog/website is visible in the lists of the University of Vaasa blogs and websites.
- In the main navigation menu on the left, select Settings > General.
- Enter a Tagline of your choice.
- Select Save Changes.
- In the main navigation menu on the left, select Settings > Reading.
- If you want your blog/website to be visible in search engines and the lists of the University of Vaasa blogs and websites, go to Search Engine Visibility and clear the Discourage search engines from indexing this site checkbox.
- Select Save Changes.
Widgets
You can add different widgets, i.e. functional elements, to the sidebar of your blog/website. On pages, these will appear above the content blocks. In addition to text and media, you can add, for example, a search field, calendar, RSS feed, social media icons or embeds.
- In the main navigation menu on the left, select Appearance > Widgets.
- Click the + icon (Add block) and choose the one you want from the box that opens.
- Select the block you added by clicking it and check its settings.
- Select Update.
- If you want to change the order, select a block and click the arrow up/down above it.
- If you want to delete a block, click the three dots and select Remove block.
Menus
You can insert lists of links, i.e. menus, into the top and sidebar of your blog/website.
- In the main navigation menu on the left, select Appearance > Menus.
- Enter a suitable title for the menu (Menu Name).
- Select Create Menu.
- Add links to the menu.
- If you want to add a link to a page within your blog/website, in the Pages tab, choose the page and select Add To Menu.
- If you want to add a link to a post within your blog/website, open Posts, choose the post and select Add To Menu.
- If you want to add a link to an external page, open Custom Links, enter the address (URL) and name (Link Text) of the page and select Add To Menu.
- If you want to add a link to the posts of a certain category, open Categories, choose the category and select Add To Menu.
- If you want to change the order, go to Menu Structure and drag the boxes to rearrange them.
- If you want to create a submenu, drag the subordinate box to the right.
- If you want to remove a link, open the box by clicking the arrow and select
- If you want the menu to appear in the top bar, select Top Menu in Menu Settings.
- Select Save Menu.
- If you want the menu to appear in the sidebar, add a navigation menu widget (see Widgets).
- If you want to edit an existing menu, find it from the list and click the Select button.
- If you want to remove a menu, open it for editing and select Delete Menu.
Previewing a post or a page
You can preview posts and pages before publishing.
- Under Publish on the right, select Preview.
- Check your post/page in the new browser tab that opens.
- When you want to continue, close the preview tab and go back to the original tab to continue editing. NOTE: If you try to go back to editing in the preview tab, you will lose any changes you make.
Mobile view
You can check how your blog/website is shown on mobile devices.
- In the top toolbar, select Customise.
- In the lower-left corner, select the device of your choice by clicking on its icon.
- Close the view by clicking the x icon in the upper-left corner.
Removing the University of Vaasa header
If you want the university logo and links from the top of your page removed, please send an email to www-tuki@uwasa.fi
Using the toolbar of the content editor
The content editor has two tabs: a visual tab and a text tab. The icons in the toolbar of the visual editor are similar to those of word processing tools. Hover over an icon to see what you can do with it.
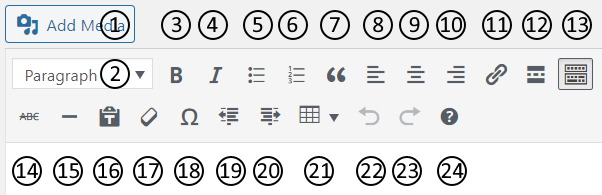
| 1. | Add media content | 14. | Strikethrough text |
| 2. | Choose a predefined style | 15. | Add a horizontal line |
| 3. | Make text bold | 16. | Paste text without formatting |
| 4. | Make text italic | 17. | Clear formatting |
| 5. | Start an unordered (bulleted) list | 18. | Add a special character |
| 6. | Start an ordered (numbered) list | 19. | Decrease indent |
| 7. | Highlight a quote | 20. | Increase indent |
| 8. | Align content to the left | 21. | Add a table |
| 9. | Center content | 22. | Undo the last command |
| 10. | Align content to the right | 23. | Redo the last command |
| 11. | Insert or edit a link | 24. | See a list of keyboard shortcuts |
| 12. | Insert a Read More tag | ||
| 13. | Show or hide the toolbar |
Embedding content from outside of your blog/website
You can embed, for example, a video from Youtube or a feed from Twitter to your post or page. If you want to embed a form to your page, please send an email to: www-tuki@uwasa.fi
- Copy the address of the Youtube video or Twitter feed.
- Open the Text tab of the content editor.
- Paste the address of the Youtube video or Twitter feed to the place of your choice.
- Select Update.
Using categories and tags in posts
You can publish as posts blog posts, news or any current articles that you want to present in chronological order and on which you want your readers to be able to comment.
Use categories to group your posts according to a general theme (e.g. news, opinions, decisions). Use tags to describe the content of a post in more detail with keywords (e.g. dissertation, award, grant). Tags will make your post more visible in search engine results. Categories are a must and correspond to the table of contents of a book, whereas tags are optional and represent the index of a book. Choose and limit your categories carefully. Tags you can use more freely.
Enter the categories and tags of a post already as you create it. You can use widgets to present groups of posts according to a category or a tag. You can also feature posts of a certain category (e.g. news) with a content block.
Read the following instructions.
Changing the writer of the post
If you use your credentials to publish a post on behalf of someone else, you can add the name of the real writer to Article Fields > Override author.